
Desmond Backpack Sew Along Step 1 – Prep work
Welcome to the first step of the Desmond Roll Top Backpack sew along! We won’t be doing any actual sewing until Thursday, but there are some initial things to take care of before we begin.
First up, make sure you have your pattern! :). The pattern is available in my Supply Shop.
For help with printing and assembling the pdf pattern at home, I have a guide to assist with that process.
Once you have your pattern, the next step is to decide on fabric and hardware. The pattern calls for 1 yard at 60″ wide of exterior fabric (the outside of the backpack). I recommend using a medium to heavy weight woven fabric, a 10oz cotton canvas for example, or a bottom weight woven. Lighter weight fabrics should be interfaced with medium weight fusible interfacing.
If you want to use something lightweight without interfacing, a nylon Cordura would work nicely. Cordura can be light but still very strong and durable.
The lining requires 1 yard at 45″ wide. I recommend using a medium weight woven fabric like 7 0z – 10 oz cotton canvas, or a bottom weight woven. Again, lighter weight fabrics can be used, but they should be interfaced with light to medium weight fusible interfacing.
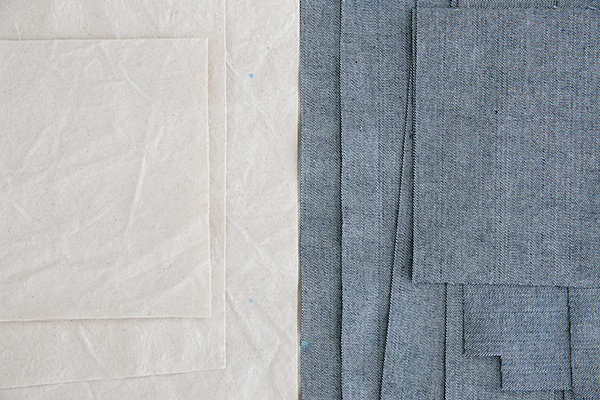
For the sew along, I am using the reverse side of denim for my exterior, and some natural canvas for the lining. One of the things I love about making bags and backpacks is that there are lots of options for fabric. Heavier apparel fabrics will work, as will home decorating and outdoor options. The sky is the limit!
I am washing my denim and canvas (separately) several times before I start sewing. The denim has a lot of starch, and I don’t want the dark blue side to bleed if the pack were to ever get wet. If necessary, wash your fabric before cutting and sewing.
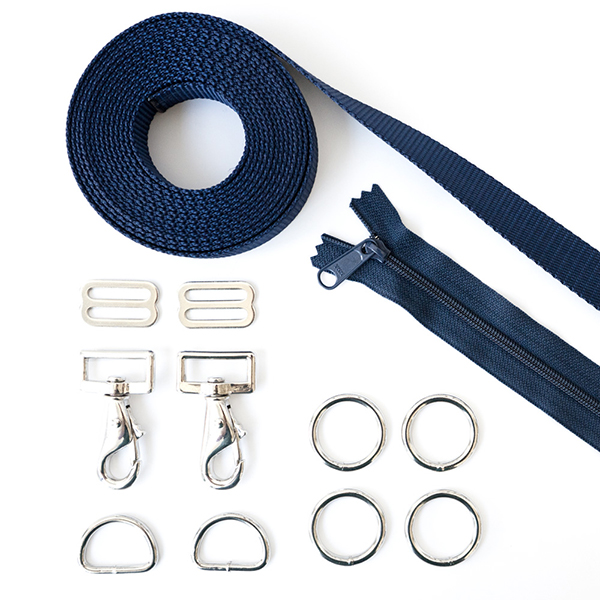
Next, we need to talk about hardware. Here are the requirements:
• (2) 1″ snap hooks
• (2) 1″ D-rings
• (2) 1″ slides
• (4) 1″ O-rings (D-Rings can be used in place of O-Rings)
• (4) Yards 1″ wide medium-weight webbing (If using natural fiber webbing, get an extra 6″)
• (1) 9″ zipper
I have two hardware kits in my Supply Shop. One has all of the above hardware, the zipper, and webbing. The other option is just the hardware if you want to choose your own zipper and webbing colors. Obviously you don’t have to buy my kit to make the pack, but I thought it would be nice to put everything in one place. You can save a $1.00 on the pattern by purchasing the pattern with a hardware kit.
If you would rather use side release buckles or a different type of clasp for the roll top straps, that is perfectly fine. You can also use other types of strap adjusters for the shoulder straps instead of O-Rings. I like the “old school” look and feel of simple metal rings and snap hooks, but that’s just my personal preference. Feel free to use whatever type of hardware you like best. There are lots of places to purchase hardware online. I’ve had good results from Strapworks and Pacific Trimming.
You don’t need any special tools for this backpack other than your sewing machine and a zipper foot. If your machine has the ability to move the needle left and right, then you might not even need the zipper foot. Speaking of needles, make sure you have the appropriate needle size and type for your fabric. I’m using a size 18 denim needle.
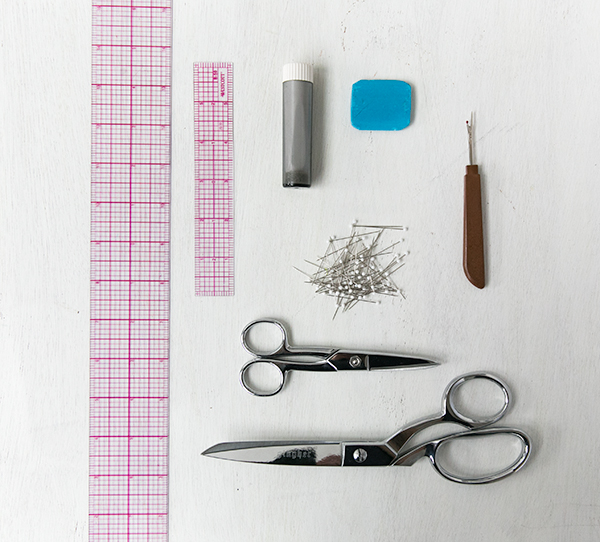
Here are a few things that I like to have on hand when sewing the Desmond backpack, or anything really. Rulers- great for checking seam allowances and making marks for placement lines. Straight pins- for holding pieces together temporarily. Chalk- my preferred method for marking lines and notches. Always check to see if the chalk will come off of your fabric. Scissors- one for clipping threads, another for trimming seams and/or cutting fabric. Seam ripper. Iron/ironing board.
Using a serger is optional. There are some places in the pattern that will need some type of overcast stitch, but a zig-zag stitch on a regular sewing machine will work just fine.
Once you have your pattern printed, assembled, and the individual pattern pieces cut out, it’s time to cut fabric. Please note that several of the pieces are used more than once for the exterior of the pack and the lining.
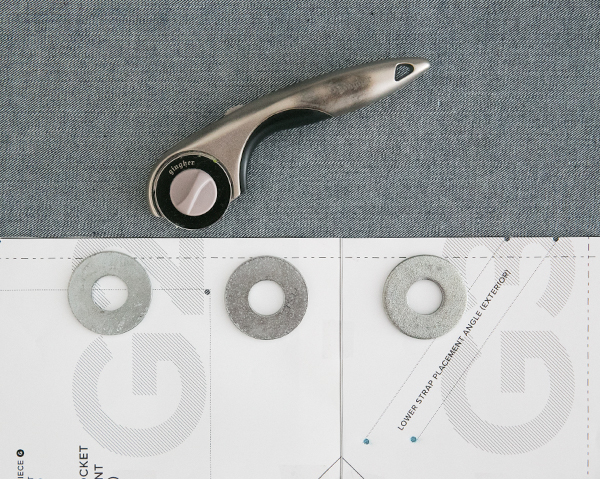
I usually use a rotary cutter with big washers as pattern weights. Use whichever method you prefer to cut patterns.
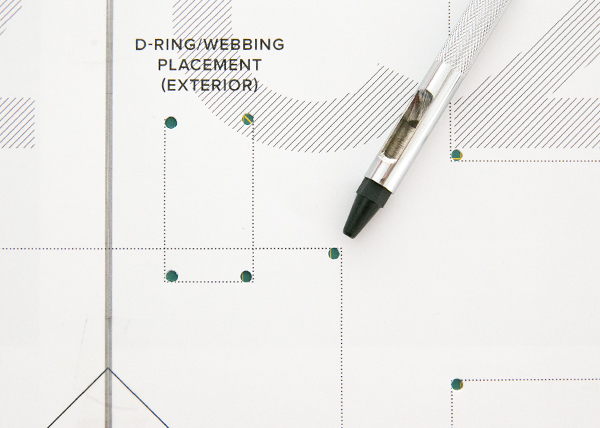
I love using a small hole punch for placement lines. If you punch holes on the inside of the lines like I did, make sure to actually draw your lines on the outside of your marks.
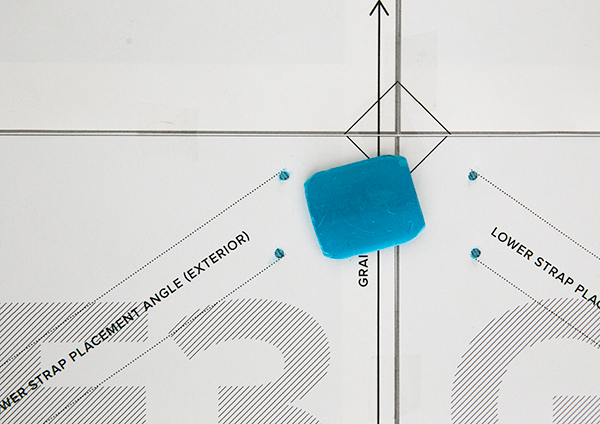
Using your method of choice, (removable chalk/pencil/ink) transfer all placement markings, notches, stitch and fold lines to the right side of your fabric. Only mark exterior placement lines on exterior pieces, and lining placement lines on lining pieces. These placement lines are marked exterior or lining on the pattern.
Alright, that’s it for this first step! Thursday we start sewing the side pockets on the exterior of the pack.
My plan is to post two steps per week for the sew along. For some people that might be too slow, for others that might be too fast. I’m trying to find a happy medium. If you can’t stay on schedule, don’t worry, as these posts will be up indefinitely to assist anyone who makes the pack in the future. If you want to sew ahead, that’s fine too! For anyone who follows me on Instagram, I will be using the hashtag #thedesmondpack for any related posts there. Feel free to tag your pictures as we sew along.
Desmond Roll Top Backpack pattern available in the Supply Shop.
Added your sew along to my social sewing calendar 🙂 http://swoodsonsays.com/sew-a-long-calendar/
Awesome! Thank you!
I have some mediumwight wool. Do you think that will work for the outside fabric?
Medium weight wool might work. Is it tightly woven, or does it have a looser weave? The other thing to consider is if the wool stretches at all. You want something that is very stable, and won’t stretch out under a little weight.
Pingback: Desmond Roll Top Backpack | Wear the Ducky Tie
Hiya, I’ve just bought this pattern and excited to make it, but I have a query about the fabric. For the outer layer, I have 7 oz duck cotton canvas OR a fabric I bought on ebay advertised as ‘Waterproof Canvas Fabric Material, 800 Denier Thick Heavy Duty, Outdoor’. It appears to be polyester coated with PVC. I’m afraid the duck cotton will be too light (?) and not resistant enough to the elements. The second fabric is heavier, more structured and waterproof, but I’m afraid it’ll be hard to sew and not really appropriate for the pattern. What do you think is the better choice of these two here? (Or any tips for giving more structure to a 7 oz canvas bag?). It’s weirdly ahrd to find 10 oz canvas in a variety of colours where I live. Sorry for the vague, rambling question, but I thought I might as well ask! Thank you! 🙂
Hi,
Without seeing your fabric options or your sewing machine, my general advice is to make the pack with the heaviest exterior and interior fabric that your machine can handle. Usually denier fabrics are nylon coated with a water resistant backing. 800 is a good exterior weight if your machine can handle it. I love nylon denier fabrics for backpacks. They are abrasion resistant, somewhat waterproof, and very durable. But if it’s too heavy for your machine, then the sewing experience will not be pleasant. You might be able to interface the lighter weight 7oz duck. You could cut out a lighter weight interfacing for the body of the pack, baste it to your canvas, and basically treat the two layers as one. Then remove the basting stitches later for a slightly heavier bag. Let me know if you have other questions.