
Desmond Backpack Sew Along Step 4 – Shoulder Straps
Hey y’all, it’s step 4 of the Desmond Backpack sew-along!
You might want to check out #thedesmondpack hashtag on Instagram. Some cool packs are starting to show up! I love seeing the different fabric choices and interpretations of the pattern. If you need a refresher from where we left off last time, you can check out Step 3. At this point, all of the pockets on the front/sides of the pack (exterior piece A) should be complete.
Shoulder Straps
If you like your shoulder straps to have a little padding, now would be the time to think about adding some. My personal opinion for a pack of this size and purpose is that padding isn’t a necessity. I don’t plan on carrying heavy objects, and don’t plan on walking really long distances with the pack. My straps will be made as written in the pattern, with no extra padding.
That being said, thin foam or batting are probably the best options for adding padding to the straps if you choose to do so. Depending on what type of material you use, you might need to adjust the seam allowances to account for the extra thickness. Also, have your padding material prepared before you sew the straps together. Thin foam could be inserted after the straps are sewn and turned, but batting should probably be basted in before sewing and turning the straps. If you add padding, be sure to leave the top 2″ of strap padding-free.
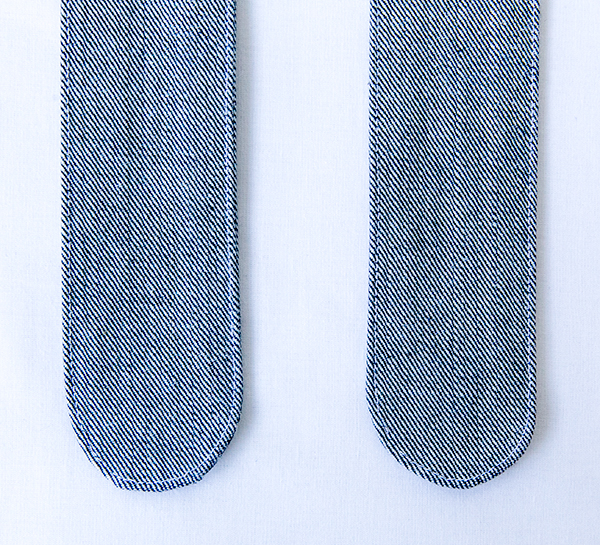
Pin two strap pieces H with right sides together and stitch, leaving tops (straight ends) open.
Repeat for other two strap pieces H. Trim seam allowances on bottom curves to 1/4″ (clip curves if desired), but leave side allowances at 1/2″ and press seams open (the extra seam allowance adds structure to the straps).

Turn straps right sides out so raw edges are concealed inside. Press straps flat from the right side, making sure to keep seams straight and aligned with the edge of straps. Starting at the top, edge-stitch all the way around each strap.
Cut two pieces of webbing 21″ long. If using synthetic fiber webbing, melt each end of webbing to prevent fraying. Align webbing, centered at the top of the strap, and edge-stitch in place. There should be about 1/2″ of strap on each side of the webbing. Stitch all the way to the bottom of the strap, across the webbing, and back up the other side.
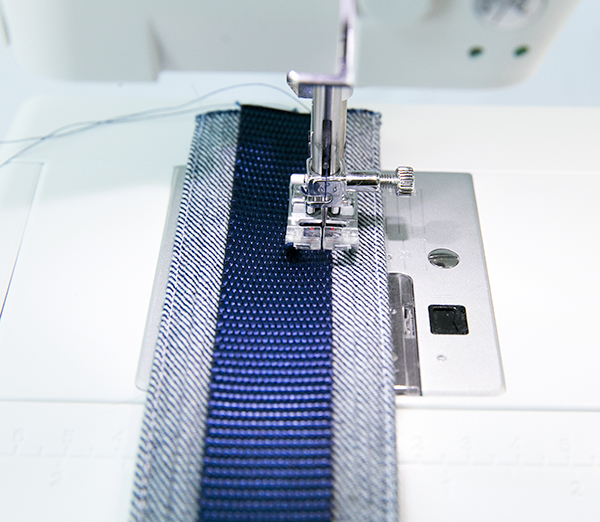
I changed the color of my thread to match the webbing so that the stitching wouldn’t show on the right side.
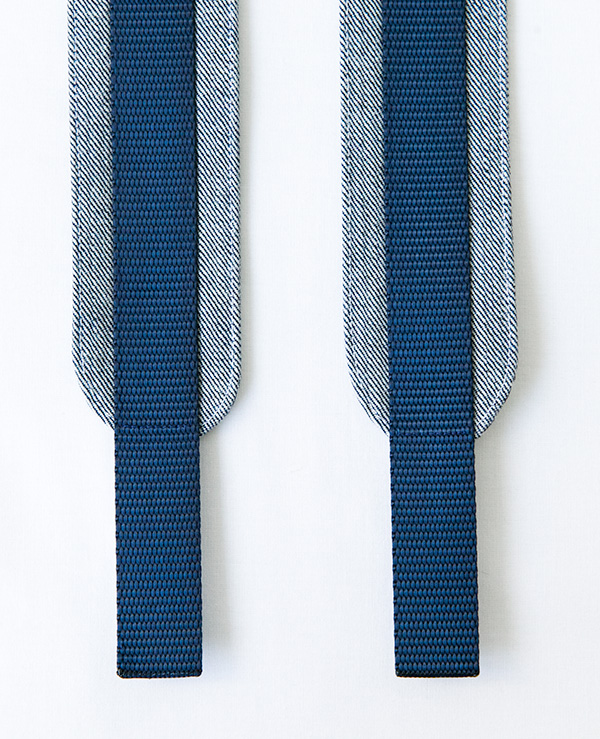
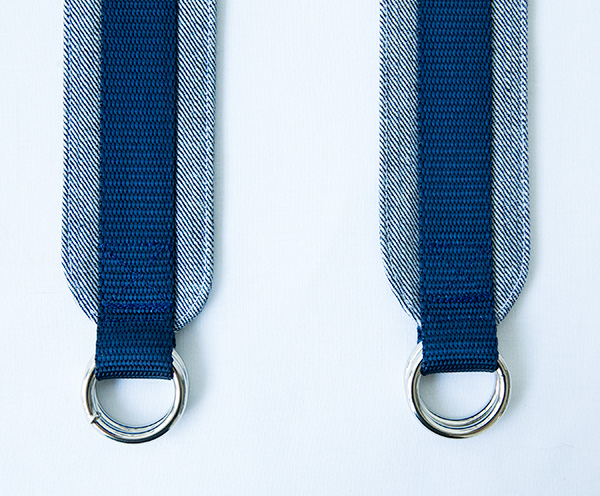
Place two O-Rings over bottom end of webbing, and fold remaining webbing to other side of strap. The end of the webbing should come up the back side of the strap by about 1-1/4″. The O-Rings should move freely, but there should not be too much slack or extra room in the webbing.
Feel through the strap to make sure top layer of webbing is lined up with folded under bottom layer of webbing. Stitch across bottom end closest to O-Rings with 5 rows of close stitches, starting and stopping at edge of webbing. Cut threads.
(note: O-Rings are not the only option here. D-Rings can be substituted, or plastic or metal strap adjusters can be used too)
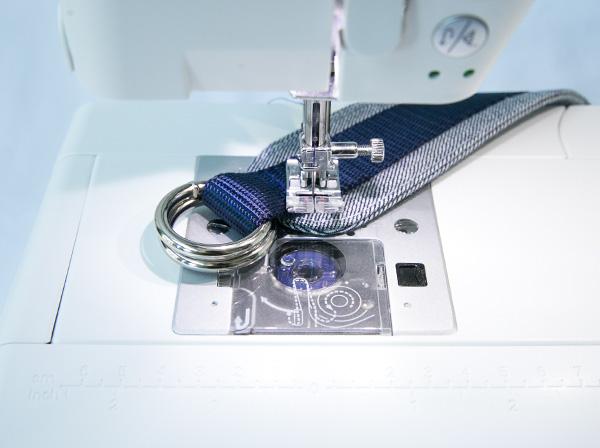
Sew an X-Pattern through all layers of webbing and strap following the numbers in (Figure 12) in the pattern instructions. Start sewing at #1 and sew to #2, stopping at each number with the needle down, and pivoting to sew towards the next number. If you are using natural fiber webbing, the top line of stitching in the X-Pattern should be fairly close to the raw end of the strap on the back side. This line of stitching should prevent further fraying.
Repeat for the other strap.
Here is the finished front side of the straps.

Here is what the back side should look like.
Lay each backpack strap with sewn on webbing facing up. Dedicate one strap as the right strap, and the other as the left strap. At the top of the straps, on the inside of each strap, measure down 1-1/8″ and make a mark.
For wide to medium shoulders, measure across the top of the strap 3/8″ and make a mark. For narrow shoulders, measure across the top of the strap 1/4″, and make a mark.
Draw a line connecting the two marks, then cut along the line, creating an angle at the top of each strap.
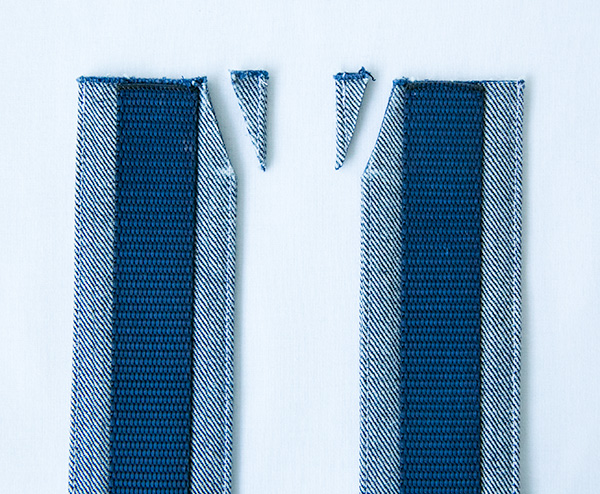
This cut will allow the straps to be set at an angle, giving a more comfortable fit and even weight distribution as the straps lay over the shoulders.
That’s all for today! We are taking it nice and slow. Next up, we will finish all of the straps including the handle, roll top straps, and lower straps.
Buy the pattern for the Desmond Pack in my Supply Shop.
I’m curious to know, what brand of sewing machine do you have?
Hi Taylor!
This is my first “serious” sewing project and I am very excited to see the end results.
However, I have found some trouble on this step (shoulder straps) and I haven’t been able to solve it. I was hoping you could guide me. For some reason my straps appear to be longer that they are supposed to. When I place the 21 inch webbing on top of the strap, it falls completely inside the strap leaving no extra webbing material at the bottom to sew the O rings. I have linked URL for you to be able to see some pictures.
Hope you can help 🙂
Hi Daniela,
Thank you for buying my pattern!
The pattern piece for the strap should only be 18.5″ long. After sewing, it will be even shorter accounting for seam allowance.
So, my best guess is that you printed the pattern at a larger scale that 100%. Many printers printer at a slightly larger scale than 100%, which would make your pattern larger overall.
How wide are you strap pieces? Lets check another piece, how wide is the back piece of your pack, Piece B?
Hi!
Thank you for replying to me so fast.
I think I did in fact print it wrong. The pattern piece is 22 1/2 inch with the seam allowance.
The strap pieces are 2 1/2 inch wide and 22 inch long. and the B piece is 15 1/2 wide.
🙁
What do you recommend me to do? Should I just continue and put a larger piece of webbing. I sew the front pocket with the zipper and that worked fine.
I think you are right, you printed at a larger scale than 100%. The back piece B should only be 12 1/2 inches wide with seam allowance. If you printed the whole pattern at a larger scale, then everything should be proportionally larger, and it should probably be fine as long as you are okay with having a larger backpack. It is a little odd that your zipper worked if you used a 9″ zipper. Did it fit between the zipper notches?