Blue Oxford Cloth Button Down Shirt

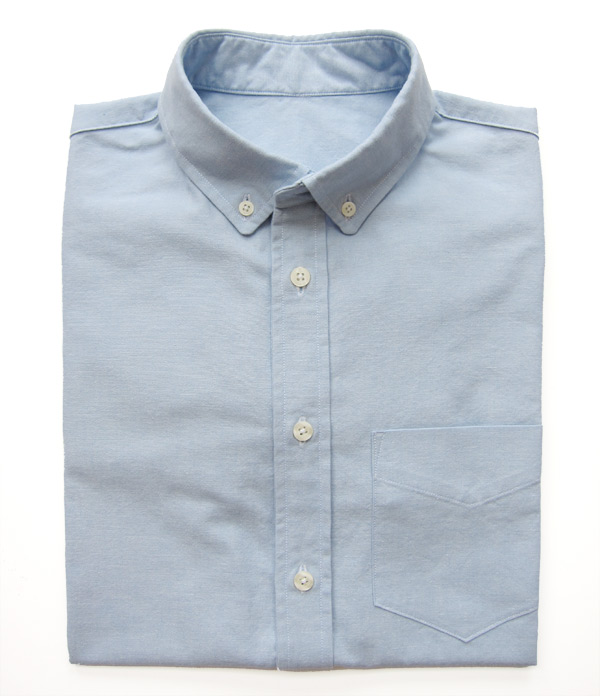
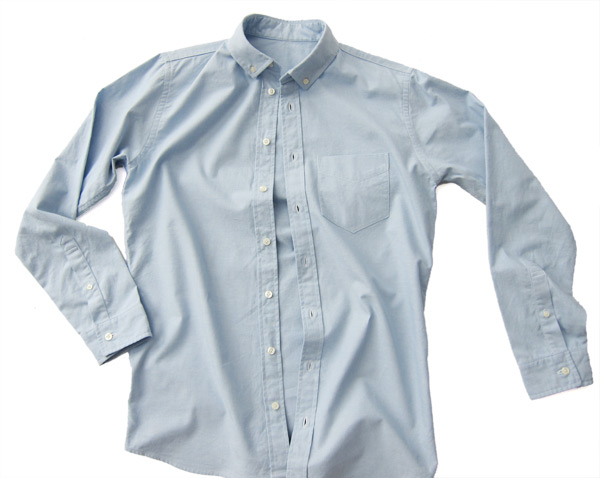
The oxford cloth button down shirt is a staple in many wardrobes. This one is made out of 1oo% cotton with sew-in interfacing for both the collar and cuffs. I used two layers of interfacing in the collar and collar stand for added structure, which may have contributed to somewhat rounded collar points. Despite trimming close to my seam allowances, the second layer of interfacing adds some extra bulk. Some shirt collars are actually designed to have rounded points, but I am usually shooting for something a little sharper. I like that the rounded corners contribute to a more casual look, but hopefully with practice, I can achieve sharper collar points.
I made a few adjustments to my pattern since the last time I made shirts.
- Slight adjustment to the curve in the yoke/shirt back seam.
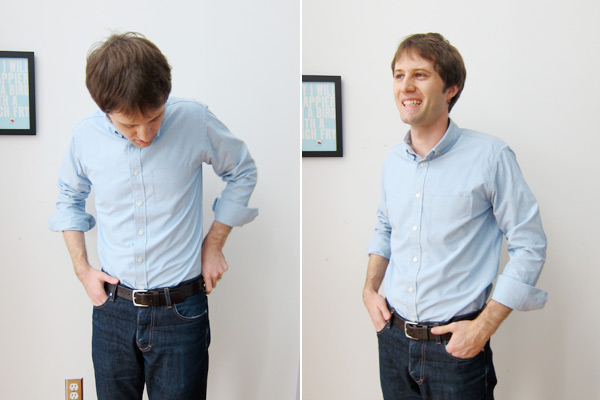
- Removed a little bit of ease below the armhole along the side seams, and took out a little bit of extra room at center back near the waist line. I’m still trying to find the right balance between too loose and boxy, and an overly slim, tight fit. I want a sharp “tailored” look, but don’t want a shirt that strains and pulls with every move.
- Lengthened sleeve plackets to make rolling up my sleeves a little easier.
- Lengthened shirt tails to help keep the shirt tucked in.

I would love to hear your favorite techniques and tricks for constructing collars/collar stands, techniques for joining the collar stand to the shirt fronts, and which methods you use to attach cuffs to sleeves. I’ve been using David Coffin’s instructions from his Shirtmaking book where the collar stand is sewn to the neckline before the collar is attached to the stand. He uses a similar method to make cuffs, but I’m always looking for new construction techniques.
Some slouchy, poor posture fit pics.


Looks great! I’m not sure if you normally just push out your collar points with a point turner, but I found this tutorial to be extremely helpful for getting a crisp, sharp point without the use of sharp objects: http://off-the-cuff-style.blogspot.com/2012/10/perfect-collar-pointsa-shirtmakers.html.
Thanks Andrea! I appreciate the link and will definitely check out that tutorial for next time. I love your blog by the way.
Taylor-
The shirt looks great! Are sleeve plackets particularly difficult to construct? I have a shirt pattern that completely changes the cuffs to “lowest common denominator” easy. Will you change the size and shape of the collar if you go for something more formal?
With regards to your collar points: the tutorial Andrea posted seems really nifty, I spotted another one recently where you use most of the bulk in the tip to reinforce the point and keep it sharp. It’s a bit counter-intutitive because you don’t clip the corner. Perhaps you’ll find it interesting!
http://www.tillyandthebuttons.com/2012/11/how-to-shape-sharp-corner.html?utm_source=feedburner&utm_medium=feed&utm_campaign=Feed%3A+tillyandthebuttons+%28Tilly+and+the+Buttons%29&utm_content=Google+Reader
Katrina, sleeve plackets are actually fairly easy. They look complicated, but all of the stitching and folding is along straight lines. David Coffin’s Shirtmaking book has a great tutorial. Peter at Male Pattern Boldness also does a step by step guide: http://malepatternboldness.blogspot.com/2011/02/mens-shirt-sew-along-4-placket-racket.html
Yes, I will probably change the shape and size of the collar when I decide to go more formal. That method of turning points also looks interesting and is something I will have to try. Thanks!
Taylor-
Your shirt turned out so very well, and even though your collar points are a bit rounded they both seem to match perfectly! Instead of using two layers of interfacing why not try a heavier interfacing instead, that will probably help with your corners. Do you go down to a small stitch for your collar points and make sure to go across one stitch straight between the two lines that meet up for your collar points, as that really helps to get a good sharp corner too!
I think your shirt fits you very well from your photos, and that you continue to perfect this pattern from the sounds of the changes you’ve made since your first shirt is brilliant.
I think it looks fabulous! Such even and perfect stitching. I made a collared shirt for my boyfriend a couple of weeks ago and you are putting it to shame! Haha!
As a side note, have you tried the interfacing from Fashion Sewing Supply? I don’t know where you’re sourcing your stabilizers, but this stuff is amazing. It’s a bit pricey, but it’s also 48″-60″ wide. Anyway, they have an actual men’s dress shirt super crisp interfacing – https://www.fashionsewingsupply.com/product_info.php?cPath=22&products_id=76&osCsid=25bbec9bbd3ebe9718b2f4ddd62846dc – and it’s 15% off right now. I have a yard of it, but I haven’t used it yet. I have been using the lightweight pro-weft fusible and it has completely changed the way I feel about fusibles. This stuff is amazing, totally worth the price!
Hi Taylor!
I think the rounded point looks great, looks intentional. I have not tried putting the collar on after the neckband has been attached like you mention, I’m curious to know what the reasoning would be behind that so I guess I’ll have to look at David’s book. I always sew the collar to the neckband and then the neckband to the neckline, clip and grade so the collar will curve around the neck easily.
As far as interfacing, sometimes you can get away without interfacing altogether, but I do prefer just one layer of a lightweight woven sew-in. I sew the interfacing to the underside piece, trim ultra-close to the stitching and then sew the two together.
Great job, love it!
I agree. Looks great!
Thanks! I haven’t tried that interfacing but will have to check it out. I bought whatever they had at Textile Fabrics for medium-weight sew-in, and used two layers since one was too flimsy. Thanks for the link!
Thanks Bri! I couldn’t find a heavier sew-in interfacing, but that is a good idea for future reference. I do try to use a small stitch near the corners, but could probably go even smaller.
I tried to comment on your blog but didn’t have any of the options for comment login. Anyway, just wanted to say that I’ve also taken a picture in that same spot at the Cosmopolitan in Las Vegas. I love all those sewing machines!
Taylor-
Wow, that is one nice looking shirt. I desperately want to know – did you make this on your industrial or domestic sewing machine?
Anyways, Kathleen at Fashion Incubator has a series on reverse engineering a shirt, and I find it fascinating and very interesting. I’ve referenced the cuff-post many times, here it is: http://fashion-incubator.com/archive/reverse_engineering_standard_work_pt7/
Thanks for sharing such a beautiful shirt!
Thanks Cathy! By attaching the collar to the collar stand (neckband) first, and then attaching the neckband to the neckline, do you ever have any issues with making sure the front edges of the neckband match the shirt fronts evenly? I think this is part of David’s reasoning behind constructing the neckband on the neckline first, and then adding the collar later.
I made the entire shirt on my industrial machine, even the buttonholes with an attachment. Kathleen always has great advice and information. I will have to review what she does with cuffs. Thanks!
The shirt looks great and fits you well. I’m just chiming in because I’ve used both the collar turning technique and the shirt crisp fusible interfacing from Fashion Sewing supply. Once you try it you’ll be totally sold. I would also suggest that you try Peter’s method of attaching the collar and stand. You’ll find it in his shirt sew-along archive. It’s much simpler than Coffin’s and the result is much more professional looking IMO.
Thanks! I’ve already tried one of the collar turning techniques and am completely sold. It made a huge difference on my practice collar. I still need to check out the interfacing though. I can’t believe I missed Peter’s method for attaching a collar. I refer to his shirt sew-along series often, but somehow missed that one. That point where the collar stand meets the shirt fronts, and the same area on sleeves where the edge of the cuff meets the edge of the placket has always been frustrating for me. I can never seem to get those areas as “clean” as I’d like. Thanks for the tip!
Taylor-
That looks great.
Where were you able to find good oxford cloth and buttons if I may ask?
I found the hardest part of constructing a shirt pattern to be making the sleeve fit the body of the shirt well.
I actually have a great local fabric store here in Nashville that sells lots of apparel fabric. They also have a good selection of buttons. You are right, one of the hardest parts is getting the sleeve/body seam to look and function the right way..
Nice shirt. Good attention to details.
Regarding collar assembly and good points….. I suggest you try all the variations you can find. And try them at least a few different times with different fabrics. Eventually you will find the method that works best for you and various fabrics.
Personally, I like David P Coffins assembly method of “bagging” the stand to the bodice and then attaching the collar. It provides the nicest transition between stand and bodice and allows for tweaking of the fit/position of the collar on the stand.
Over the years I’ve used many different methods to attain good collar points. A “turning” method works well for crisp thin fabrics. A “push/poke” method works well for bulky loose structure fabrics. And a “pull/prick” method for most fabrics.
I’ve also discovered it often helps to eliminate bulk at the very point by trimming the interfacing shy of the point. Just chop off the point about 1/8 – 1/4″ shy of the actual finished point, depending on the fabric thickness. Less for thin, more for thicker. Then use the “pull” method with thread for turning the point, like what Pam demonstrates on her “Off the Cuff” blog.
I also use Pam’s woven crisp shirt interfacing from her FashionSewingSupply website. It’s the best I’ve ever found, although despite the claim that it doesn’t shrink, I find it does, ever so slightly – about 1/8″ over a 20″ collar spread. But it holds fast through repeated launderings much longer than anything else I’ve used. I also like it’s weight and quality of consistency in both fabric and adhesive.
‘Looking forward to seeing your next project.
Steve aka “Bobbin Doctor”
Thanks for all the tips Steve! I’m still on the fence about fusible interfacing. I know they have gotten better over time, but I am still unsure about them. Maybe I just need to give fusibles a try.
I also like David Coffin’s techniques, but I just can’t seem to get the results I want in two areas, where the collar band meets the shirt fronts, and where the sleeve placket meets the edge of the cuff. Coffin pretty much uses the same technique in both places, but when I turn these areas to the right side, they never fully open for me, and I’m cutting closer than 1/8″ to the seam allowance sometimes. Maybe it is the interfacing I’m using.
Taylor,
It looks like you’ve received a lot of advice on the collar points. Here’s another from Brian Sews: http://www.briansews.com/2012/10/perfect-collar-points.html.
The shirt looks really great by the way.
John
Brian always has great tips and tricks. I’ll have to check this out. Thanks John!